Manual testing still catches 60–85% of real-world UX bugs that automation misses. This guide covers 8 advanced strategies — risk-based testing, exploratory testing, BVA/EP, regression, peer reviews, E2E testing, test data management, and continuous improvement — with step-by-step implementation, the most common mistakes to avoid, measurable expected outcomes, and how Tuskr’s test management platform accelerates each strategy.
Here’s the uncomfortable reality about manual software testing: most QA teams already know what risk-based testing, exploratory testing, and regression testing are. The strategies themselves aren’t secrets. The gap lies in knowing when to apply each one, how to implement them without burning out your team, and which tools make execution sustainable.
This guide doesn’t just list techniques — it’s designed to help you make decisions. Each strategy includes a clear “when to use it” framework, specific step-by-step implementation, the most common and costly mistakes teams make, measurable outcomes you can expect, and a concrete walkthrough of how Tuskr makes execution faster and more reliable.
Which Strategies Do You Need Right Now?
Your biggest QA challenges depend on where your team is in its journey. Use this navigator to jump to what’s most relevant for your situation:
Building QA From Scratch
No formal process, greenfield product, or new QA hire figuring out where to start.
Drowning in Test Debt
Regression bloat, flaky test data, or too many tests that aren’t finding real bugs.
Scaling Your QA Team
Growing headcount, major release approaching, or transitioning to a new tool stack.
All 8 Strategies at a Glance
Before diving deep, here’s how each strategy compares across effort, impact, and where Tuskr provides the most leverage:
| Strategy | Best For | Implementation Effort | Impact on Quality | Key Tuskr Feature |
|---|---|---|---|---|
| 1. Risk-Based Testing | Pre-release sprints | Medium | Very High | Priority tags + filtered runs |
| 2. Exploratory Testing | New features, UX validation | Low | High | Dynamic run documentation |
| 3. BVA & EP | Form & API input testing | Low | Medium-High | Reusable test case templates |
| 4. Regression Testing | Every release cycle | Medium | Very High | Tagged suites + build linking |
| 5. Peer Reviews | Test case quality assurance | Low | Medium | Inline comments + notifications |
| 6. End-to-End Testing | Integration & pre-release gates | High | Very High | Comprehensive test plans |
| 7. Test Data Management | All environments & teams | Medium | Medium-High | Custom fields + file attachments |
| 8. Continuous Improvement | Long-term QA maturity | Medium | High (compounding) | Analytics & defect reporting |

Risk-Based Testing: Prioritize the Critical
Decision-making framework · Resource optimization · Release safetyWhat it is: Risk-based testing (RBT) is a systematic approach to prioritizing test cases by calculating the probability of failure multiplied by the business impact of that failure. Instead of treating every feature with equal importance, you allocate your heaviest testing effort where a failure would hurt most — saving time without sacrificing safety.
⏰ When to Use This Strategy
- Pre-release sprints where time is limited and you cannot test everything
- Payment systems, user authentication, or data privacy features where failure has direct financial or legal consequences
- Regulated industries (fintech, healthcare, e-commerce) where defect escapes trigger compliance penalties
- After analyzing defect history showing recurring failures in specific modules
- Any time a stakeholder asks “what are we testing first?” — RBT gives you a defensible, data-driven answer
How to Build and Use a Risk Matrix
- 1 Score every feature or module. Rate each on two dimensions: Probability of Failure (1–5) and Business Impact of Failure (1–5). Multiply: a payment module scoring 4×5 = 20 is far higher priority than a settings page scoring 2×2 = 4.
- 2 Segment by tier. 16–25: Critical — full coverage required. 9–15: Medium — 70–80% coverage target. 1–8: Low — sanity-level or skipped under time pressure.
- 3 Link to your requirements traceability matrix (RTM). Map each risk score to the specific test cases covering that area. This turns a risk ranking into an executable plan.
- 4 Use historical defect data to calibrate. Past defect reports reveal chronically unstable areas. Weight these higher even if the current code looks stable — history predicts the future.
- 5 Reassess every sprint. Risk profiles change as code changes. A module that scored 6 last sprint may score 18 after a major refactor. Treat your risk matrix as a living document.
⚠️ Common Mistakes to Avoid
- “Everything is high priority”: If nothing has a lower priority, you have a planning problem, not a testing problem. A useful risk matrix must have real variation.
- Ignoring low-probability/high-impact risks: Payment failures may be rare, but they’re catastrophic. Never skip critical coverage because something “rarely breaks.”
- Static risk registers: A risk matrix from six months ago doesn’t reflect today’s codebase. If you’re not updating it, you’re prioritizing against a ghost.
📊 Expected Outcomes
Teams that implement risk-based testing consistently catch 35–40% more critical bugs per sprint compared to flat-coverage approaches. They also report spending 20–30% less time on low-value test execution — time that gets reinvested in higher-risk areas or exploratory sessions.
🛡️ How Tuskr Accelerates This
Tuskr’s custom fields let you add a Risk Level field (Critical / High / Medium / Low) and a Business Priority rating to every test case. Create filtered test runs that surface only high-risk cases — Tuskr executes the right tests at the right time. The workload distribution chart ensures your most experienced testers are assigned to the riskiest modules, not spread thin across everything.
Exploratory Testing: Find What Scripts Miss
Unscripted discovery · UX validation · Edge-case huntingWhat it is: Exploratory testing is simultaneous test design, execution, and learning — guided by a tester’s experience and intuition rather than predefined scripts. Unlike scripted testing, it mimics how real users actually interact with software, following unexpected paths that no script anticipates. It’s not “clicking around randomly” — it’s structured discovery.
⏰ When to Use This Strategy
- Validating new features before writing formal scripted test cases
- Post-refactoring validation where code structure changed significantly but behavior should be identical
- UX and accessibility edge case discovery that scripted tests can’t simulate
- Security and permission boundary checks
- When you’re new to a module and need to “learn the territory” before scripting
- Rapid feedback needed on a build that isn’t ready for full regression
How to Run Structured Exploratory Sessions
- 1 Write a test charter before you start. Format: “Explore [area] using [technique or data set] to discover [risks or information].” Example: “Explore the checkout flow using expired credit cards to discover how error states are handled.” This gives focus without eliminating discovery.
- 2 Time-box to 60–90 minutes. Beyond 90 minutes, tester attention degrades and bugs get missed. Schedule break + debrief after every session.
- 3 Use a persona lens. Don’t test as yourself — test as a specific user archetype. First-time user who skips instructions. Power user who uses keyboard shortcuts. Mobile user on 3G. This dramatically widens your path coverage.
- 4 Document everything in real time. Actions taken, anomalies observed, questions raised, bugs found, and paths that found nothing — all of it. Undocumented exploratory testing produces undocumented bugs.
- 5 Debrief within 30 minutes. Review session notes while memory is fresh. Classify findings: confirmed bugs, observations to investigate, coverage gaps to address in future sessions.
⚠️ Common Mistakes to Avoid
- “Clicking around randomly”: Without a charter and session notes, exploratory testing is just undocumented usage. You can’t reproduce the bugs you find, and you can’t prove to anyone that you tested anything specific.
- Overlapping with scripted tests: If a scripted test already covers the login flow comprehensively, don’t spend exploratory time there. Use exploratory sessions on the territory your scripts don’t reach.
- No debrief process: Half your value is lost if you end the session without converting raw session notes into formal findings. The debrief is not optional.
📊 Expected Outcomes
Exploratory testing consistently identifies 2–3× more unique defects per hour than scripted testing, particularly for UI/UX issues, accessibility failures, and functional edge cases. Its value compounds over time as testers build deeper product knowledge.
🛡️ How Tuskr Accelerates This
Tuskr’s test run interface supports real-time note-taking during exploratory sessions. Testers can log findings, attach screenshots or video clips, and raise defects inline without breaking session flow. The complete history of every exploratory run is searchable and attributable, so patterns across sessions become visible — and managers can see that exploration is producing value, not just time.
Boundary Value Analysis & Equivalence Partitioning
Test case reduction · Black-box coverage · Input domain optimizationWhat it is: These two techniques are used together to minimize test case volume while maximizing input coverage. Equivalence Partitioning (EP) groups input values into classes where the system behaves identically — you test one representative from each class, not every possible value. Boundary Value Analysis (BVA) then targets the edges of those classes, where bugs most commonly hide.
⏰ When to Use This Strategy
- Testing form fields with numeric or string input ranges (age: 18–120, password: 8–64 characters)
- API parameter validation (page size: 1–1000, quantity: 1–99)
- Pricing tier boundaries (bulk discount triggers at 10, 50, 100 units)
- Date range validations, file size limits, character limits
- Any input where “test all possible values” is mathematically impossible
How to Apply BVA + EP Together
Consider a quantity field accepting values from 1 to 100. Here’s the full technique in action:
- 1 Define all equivalence partitions. Valid range: 1–100. Below-valid: 0 or negative. Above-valid: 101+. Invalid type: non-numeric input (letters, symbols). That’s 4 partitions from one field.
- 2 Select EP representatives. One test case from each partition: 50 (valid mid-range), -1 (below valid), 150 (above valid), “abc” (non-numeric). Four test cases cover your EP baseline.
- 3 Apply BVA at each boundary. Lower boundary zone: 0, 1, 2. Upper boundary zone: 99, 100, 101. These 6 values cover the edges where off-by-one errors live.
- 4 Combine into your test suite. Total: ~10 focused test cases instead of exhaustive testing of hundreds. Same defect detection coverage, fraction of the effort.
⚠️ Common Mistakes to Avoid
- Skipping invalid partitions: Most teams test valid ranges and forget invalid inputs — null values, negative numbers, special characters, wrong data types. These are exactly where security vulnerabilities and crashes hide.
- Off-by-one in BVA: Always test the boundary itself AND the values immediately inside and outside it (e.g., 99, 100, 101). Testing only 100 misses the boundary edge cases that matter most.
- No partition documentation: If reviewers can’t see which partitions you identified, they can’t verify your coverage. Document your partition analysis, not just the resulting test cases.
📊 Expected Outcomes
BVA + EP typically reduces test case count by 50–60% while maintaining equivalent defect detection rates. Teams report spending 40% less time writing test cases for input validation scenarios — a direct productivity gain with no quality tradeoff.
🛡️ How Tuskr Accelerates This
Tuskr lets you build structured test case templates with custom fields for input values, partition classifications, and expected outputs — all stored and reusable. When boundaries change during development, Tuskr’s bulk-edit feature updates shared fields across all related test cases in one action. Test cases can be cloned and modified for boundary variations, eliminating repetitive manual creation.

Regression Testing: Avoid Redundancy, Catch Regressions
Release safety · Change validation · Sustainable velocityWhat it is: Regression testing re-validates existing functionality after any code change — a new feature, bug fix, dependency upgrade, or refactor. The core challenge: regression suites grow over time until running “everything” before each release takes days. The solution isn’t to run less — it’s to run smarter.
⏰ When to Use This Strategy
- After every sprint release or hotfix deployment — no exceptions
- After upgrading third-party libraries or frameworks that shared modules depend on
- Following refactoring efforts that restructure existing logic without changing interface contracts
- Before any release touching shared utility modules, authentication, or core data layers
Impact-Based Regression: Test Smarter, Not Everything
- 1 Perform impact analysis before each regression run. For each code change, identify direct impacts (changed files) and indirect impacts (modules that depend on changed files). Your test run covers impacted areas first.
- 2 Define a non-negotiable core regression suite. A subset of 20–30 critical-path cases that always runs regardless of change scope: login, core workflows, data integrity, payment flows. These run on every build.
- 3 Tag extended regression cases separately. Run the full extended suite every 2–3 sprints, or before any major release. For routine changes, run only the core suite + impact-scoped cases.
- 4 Retire stale test cases regularly. Quarterly, audit your regression suite. Every test case for deprecated functionality adds execution debt. Remove them before they accumulate into bloat.
- 5 Lock test runs after execution. Once a regression run is complete, lock it. This preserves the result integrity as an audit record and prevents post-hoc edits that undermine release sign-off.
⚠️ Common Mistakes to Avoid
- Regression bloat: Never deleting retired test cases. Every deprecated feature adds to your suite’s runtime until regression testing takes days instead of hours.
- “Run everything every time”: Sounds thorough, wastes days. A well-selected impact-based regression suite catches more regressions per hour of testing than an exhaustive full suite.
- Automation-or-nothing thinking: Not every regression case should be automated. Some critical-path flows require human judgment to properly validate UI state, content quality, and user experience.
📊 Expected Outcomes
Impact-based regression selection catches 20–25% of all regressions per release in approximately one-third the execution time of a full suite. Teams using this approach maintain release velocity without accumulating test debt.
🛡️ How Tuskr Accelerates This
In Tuskr, tag test cases as “core regression” or “extended regression” and associate them with specific builds or release versions. Launch your core suite with one click when a build is ready. Tuskr’s lock feature preserves run integrity after execution — creating a verifiable audit trail for every release. The PDF status report lets you share regression results with clients and stakeholders without raw tool access.
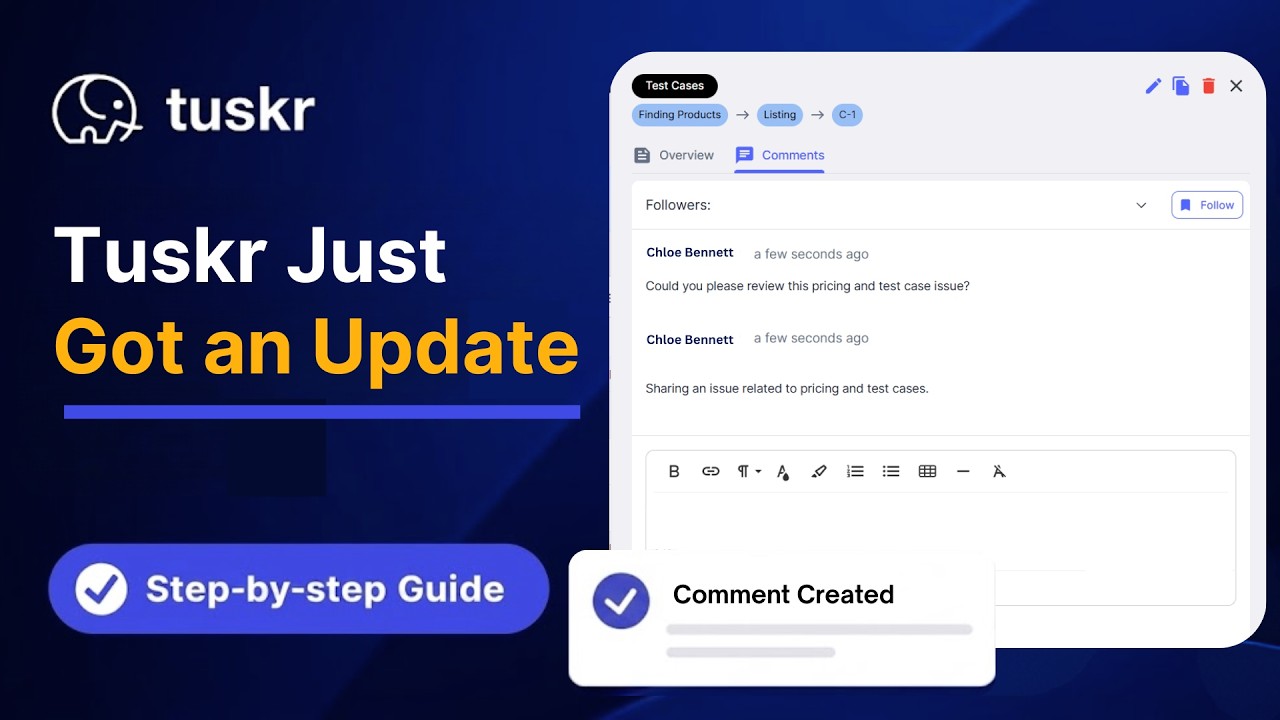
Peer Reviews & Feedback Loops
Team collaboration · Test case quality · Coverage gap preventionWhat it is: Peer review of test cases is the QA equivalent of code review — a structured process where a second team member evaluates your test cases for completeness, clarity, accuracy, and coverage before execution. It’s one of the highest-ROI quality improvements available to any QA team, requiring no tools beyond attention and process.
⏰ When to Use This Strategy
- Before beginning execution of any new test cycle — reviews happen before the sprint starts, not after
- When a tester is new to a module or feature area and may not know its edge cases
- After major specification changes that require test case rewrites
- When a particular module has a history of high defect escape rates — reviews can reveal coverage gaps
How to Run Effective Test Case Reviews
- 1 Use a standard review checklist. Is each step unambiguous? Is the expected result measurable (not “page loads correctly” — “response returns HTTP 200 and displays order confirmation within 3 seconds”)? Are prerequisites defined? Are boundary conditions included?
- 2 Apply the fresh-eyes principle. The reviewer must not be the author. Ideally, include someone who knows the feature from a different angle — a developer reviewing QA assumptions, or a senior tester reviewing a junior’s cases.
- 3 Document all review feedback formally. Verbal feedback disappears. Written comments on specific test cases create institutional knowledge that improves the team’s average test case quality over time — not just this sprint’s.
- 4 Close the loop explicitly. After incorporating review feedback, confirm with the reviewer that their concerns were addressed. This builds trust and makes the next review cycle faster.
⚠️ Common Mistakes to Avoid
- Skipping reviews under sprint pressure: This is backward — reviews are most valuable precisely when time is tight, because that’s when test cases are written most hastily and miss the most scenarios.
- Verbal-only feedback: “I mentioned it in standup” doesn’t count. Undocumented feedback is lost the moment the meeting ends.
- Reviewing without context: A reviewer who doesn’t understand what the feature is supposed to do can’t identify what test cases are missing. Brief reviewers before they review.
📊 Expected Outcomes
Teams with formal peer review processes report 25–30% better test coverage as reviewers consistently surface scenarios the original author missed. After 3–6 months of disciplined reviews, teams develop shared quality standards that measurably improve average test case quality across the board.
🛡️ How Tuskr Accelerates This
Tuskr’s comment system enables contextual feedback directly on individual test steps — not in a separate document or buried in a Slack thread. Reviewers @mention authors, who get instant notifications. The complete review thread is preserved on each test case permanently, creating institutional memory that new team members can learn from and that auditors trust. No separate review tool needed.
Ready to Run Smarter Tests?
Tuskr makes risk tagging, exploratory session logging, regression suite management, and peer review collaboration seamless — all in one platform your entire team will actually use.
Start Free — No Credit Card Explore All FeaturesEnd-to-End & System Testing
Integration validation · Release gates · Complete workflow coverageWhat it is: End-to-end (E2E) testing validates complete user journeys across all system components — from UI through APIs, databases, third-party services, and back. Unlike unit or component tests that validate pieces in isolation, E2E testing exposes failures that only emerge when everything runs together in a realistic environment.
⏰ When to Use This Strategy
- Before any major release touching multiple integrated systems
- After integration sprints where new APIs or third-party services are connected
- As the final gate before UAT (User Acceptance Testing)
- Validating multi-step business-critical workflows: checkout, onboarding, approval chains, data exports
- After environment upgrades or infrastructure changes that could affect runtime behavior
How to Design Effective E2E Test Scenarios
- 1 Map real user journeys first. Analyze product analytics or interview stakeholders to identify the 5–10 workflows that account for 80% of user activity. These are your must-test E2E scenarios — not arbitrary paths through the UI.
- 2 Ensure environment parity. Your staging environment must mirror production: same integrations, same data volumes, same configurations, same third-party service versions. Testing against a misconfigured staging environment produces false confidence.
- 3 Validate data flow, not just UI behavior. For each E2E scenario, verify that data entered at step 1 arrives correctly in the database and surfaces accurately in downstream modules. E2E is not just “click through the screens.”
- 4 Include failure and recovery scenarios. Test failed payments, session timeouts, invalid file uploads, concurrent user conflicts. 70% of production incidents come from error states, not the happy path.
⚠️ Common Mistakes to Avoid
- Happy-path-only E2E suites: If your E2E tests only cover success flows, you’re missing most of where production bugs live. Error handling, edge cases, and failure recovery are mandatory coverage areas.
- Environment mismatch: Testing against a staging environment 3 versions behind production is worse than not testing — it gives false confidence and masks the regressions that matter.
- Running E2E only at release time: E2E testing done as a last-minute gate creates panic. Build E2E milestones into the sprint cycle — test earlier, fix cheaper.
📊 Expected Outcomes
Well-maintained E2E suites catch 40–45% of integration-specific defects that unit and component tests miss entirely. Teams with formal E2E release gates report significantly fewer production incidents from integration failures — the kind that are most expensive to diagnose and fix.
🛡️ How Tuskr Accelerates This
Tuskr’s test plan framework organizes E2E scenarios by user journey, with multiple modules and test suites grouped under a single plan for a complete release picture. The PDF status report exports clean stakeholder-facing progress reports without raw tool access. Manual and automated test cases coexist in the same plan — so your E2E suite can mix human-validated steps with CI/CD-triggered automation in a single, unified view.
Test Data Management: Consistency That Scales
Data compliance · Repeatability · Environment reliabilityWhat it is: Test Data Management (TDM) is the systematic practice of creating, organizing, and maintaining the data your tests depend on. Poor TDM is one of the leading causes of intermittent test failures — the “passed yesterday, fails today for no obvious reason” problem that destroys team confidence in the test suite.
⏰ When to Use This Strategy
- When test failures are environment-specific or intermittent — often a test data problem in disguise
- When multiple team members share a single test environment and step on each other’s test state
- Any time you’re working with personal data subject to GDPR, India’s DPDP Act, or other privacy regulations
- When onboarding new testers who need consistent, known starting states to run tests reliably
- Before scaling test automation — automation fails unpredictably without disciplined test data
How to Implement Structured TDM
- 1 Classify your data into three types. Static reference data (product catalog, configuration values) — never modify. State-dependent data (user accounts, order records) — reset between runs. Accumulating data (logs, audit trails) — archive regularly. Each type needs a different management approach.
- 2 Use synthetic data for any PII. Never use real customer data in testing environments. Generate realistic but fabricated data. Beyond the compliance benefit, synthetic data is more reliable — it doesn’t change unpredictably the way production data does.
- 3 Create environment-specific datasets. Dev, QA, staging, and UAT need tailored datasets appropriate for their testing purpose. Sharing one dataset across all environments creates conflicts and hides environment-specific bugs.
- 4 Build and automate data reset scripts. Tests that modify data should clean up after themselves. Automated environment reset ensures every test run starts from a known, deterministic state — the foundation of repeatable testing.
⚠️ Common Mistakes to Avoid
- Using real production data in testing: Beyond the compliance risk (GDPR, DPDP), production data changes over time — making your tests non-repeatable. It also creates liability if that data is exposed in a test environment breach.
- Stale test data: Test data from 6 months ago may reference deleted records, expired auth tokens, or deprecated configurations. Audit and refresh test data every quarter.
- Undocumented data dependencies: If test case B requires output from test case A, that dependency must be explicitly documented. Hidden dependencies create order-dependent test suites that are fragile at scale.
📊 Expected Outcomes
Structured TDM reduces environment-related test failures by 40–50%. Teams also report significant reductions in “environment setup time” — the unproductive time testers spend getting to a starting state rather than actually testing.
🛡️ How Tuskr Accelerates This
Tuskr’s custom fields let you attach structured test data specifications directly to individual test cases — input values, required prerequisite states, expected database conditions. No more hunting through Confluence or spreadsheets to find what data a test case needs. File attachments support dataset files for data-heavy scenarios, keeping everything versioned and traceable. Testers always know exactly what state they need before they start.

Continuous Improvement: Build a QA Team That Gets Better
Process maturity · Metrics-driven QA · Long-term defect reductionWhat it is: Continuous improvement in QA is a structured retrospective loop that measures testing effectiveness, analyzes where defects escape, and systematically upgrades your approach sprint over sprint. It’s the difference between a QA team that improves year-over-year and one that plateaus at “good enough.”
⏰ When to Use This Strategy
- After every release — a brief retrospective on what your test suite caught vs. what escaped to production
- When the same types of bugs recur in production despite test coverage in that area — a signal your tests are testing the wrong things
- Quarterly QA health reviews to track metrics trends and identify systemic issues
- When scaling the team — ensuring new members improve, not dilute, overall quality standards
The Four Metrics Every QA Team Should Track
- 1 Defect escape rate. What percentage of total bugs are found in production vs. in testing? Target: below 10%. Industry average: 15–25%. This is your most important single metric.
- 2 Test case effectiveness rate. Of test cases executed, what percentage found at least one bug? Low-effectiveness cases are candidates for redesign or retirement — they’re consuming execution time without returning value.
- 3 Mean time to detect (MTTD). How quickly are defects found after code is written? Same-sprint detection costs 5–10× less to fix than production defects. Shorter MTTD = cheaper overall quality cost.
- 4 Regression rate. What percentage of new bugs are regressions vs. bugs in new functionality? A rising regression rate signals inadequate regression coverage and demands immediate attention.
⚠️ Common Mistakes to Avoid
- Measuring activity instead of outcomes: “We ran 800 test cases this sprint” is an activity metric. “We found 14 bugs, including 3 critical path blockers, before release” is an outcome metric. Measure what actually matters.
- No feedback loop from production: If your development team doesn’t share production incident reports with QA, you’re blind to your most important data. The defects that escaped are the ones most worth understanding.
- Retrospectives without actionable changes: A retrospective that produces observations but no process changes is theater. Every session must end with at least one concrete change to test cases, process, or tooling.
📊 Expected Outcomes
QA teams with structured continuous improvement cycles achieve 20–30% year-over-year improvement in defect detection rates. Teams that track defect escape rate consistently see it fall below 10% within 12 months of disciplined measurement and retrospective action.
🛡️ How Tuskr Accelerates This
Tuskr’s reporting suite delivers pass/fail rates, coverage trends, defect status, and activity stream data out of the box — no custom dashboards needed. Integration with Jira closes the feedback loop between production incidents and QA gaps. The burndown chart makes sprint testing progress visible to the entire team, not just QA leads. Audit logs show exactly what changed, who changed it, and when — invaluable for root-cause analysis in retrospectives.
How Tuskr Makes Every Strategy Faster to Execute
Tuskr is built around a single premise: powerful test management shouldn’t require complex setup or a dedicated tools administrator. Here’s what that looks like across the features your team uses every day:
Reporting & Analytics
Burndown charts, pass/fail trends, coverage dashboards, and defect status reports. Everything you need to prove QA value to stakeholders and improve over time.
Centralized Test Case Library
Single source of truth for all test cases. WYSIWYG editor with image paste support, bulk edit, custom fields, spreadsheet import, and full version history.
Real-Time Team Collaboration
Comments, @mentions, notifications, and workload distribution charts keep testers, developers, and managers aligned without extra meetings.
CI/CD & Tool Integrations
Jira, Pytest, Cypress, Playwright, Jenkins, and more. CLI tool for attaching logs and screenshots from automation runs. Zapier for custom workflows.
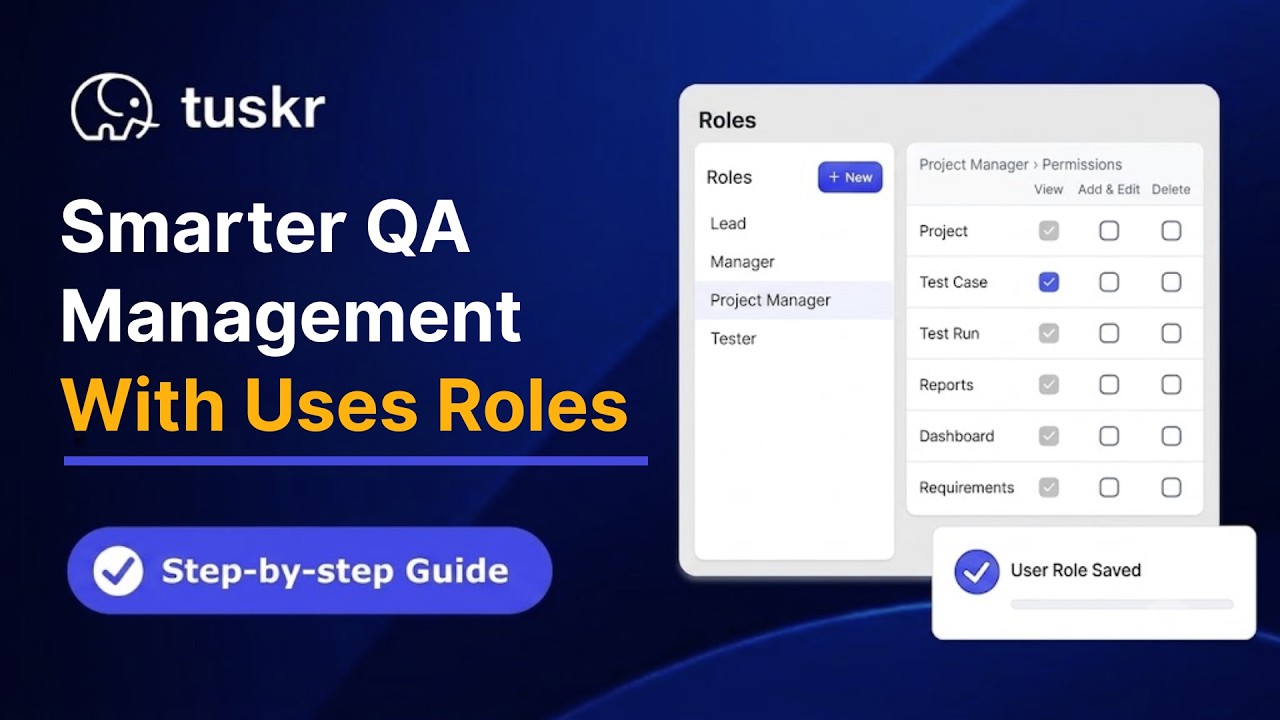
Enterprise-Grade Security
Role-based access control, 2FA, SSO, full audit logs, and a recycle bin for accidental deletions — available even on Tuskr’s lower-tier plans.
Dark Mode & Ergonomics
Full dark mode for reduced eye strain during long sessions. A clean, distraction-free interface that testers find pleasant to use — which means they actually use it.
Tuskr vs Alternatives: An Honest Comparison
When evaluating test management platforms, these are the features QA teams actually compare. Here’s how Tuskr stacks up:
| Feature | Spreadsheets | TestRail | Tuskr ✦ |
|---|---|---|---|
| Free plan available | ✓ | ✗ | ✓ |
| Custom risk fields on test cases | ~ Manual | ✓ | ✓ |
| Exploratory run documentation | ✗ | ~ Limited | ✓ |
| Regression suite tagging + build links | ✗ | ✓ | ✓ |
| Inline peer review comments | ~ Cell notes | ~ | ✓ |
| Workload distribution chart | ✗ | ✗ | ✓ |
| Burndown progress chart | ✗ | ✗ | ✓ |
| CI/CD CLI integration | ✗ | ✓ | ✓ |
| Full audit trail | ✗ | ~ Paid only | ✓ |
| Recycle bin (restore deleted items) | ✗ | ✗ | ✓ |
| Dark mode | ✗ | ✗ | ✓ |
| Pricing (small team) | Free | ~$49/user/mo | Free plan or ₹450/user/mo |
✓ = Fully supported · ~ = Partial or workaround required · ✗ = Not supported. Based on publicly available feature information at time of publication.

Frequently Asked Questions
Manual software testing is the process where human testers evaluate software by interacting with it directly — without automated scripts — to find functional defects, usability issues, and edge-case failures. It remains essential because automation cannot replicate human judgment: UX intuitiveness, accessibility perception, contextual errors, and novel user paths all require a person to evaluate. Studies consistently show 60–85% of real-world UX defects are found by manual testers, not automated suites.
Manual testing is the better choice for: exploratory testing of new or changing features, UX and usability validation, one-time scenarios that aren’t worth the automation investment, early-stage prototypes with unstable UI, and any scenario requiring human judgment (visual design quality, content tone, accessibility experience). Automated testing excels when tests are repetitive, data-intensive, must run on every build, or the UI is stable enough that maintenance cost is justified by execution speed.
Risk-based testing prioritizes test cases using the formula: Risk Score = Probability of Failure × Business Impact of Failure. To build a risk matrix: (1) list all features/modules; (2) score each on Probability of Failure 1–5 and Business Impact 1–5; (3) multiply scores; (4) rank features from highest to lowest; (5) allocate testing resources proportionally to risk score. Critical tier (16–25) gets full coverage. Medium tier (9–15) gets 70–80% coverage. Low tier (under 9) gets sanity-level or is deprioritized when time is tight. Reassess the matrix every sprint.
Experienced manual testers write 5–15 detailed test cases per day depending on domain complexity and feature familiarity. However, raw test case count is less important than coverage efficiency. A tester using Boundary Value Analysis and Equivalence Partitioning might write 10 test cases that cover what 40 non-optimized cases would cover — that’s a better outcome for the team. Focus on quality of coverage, not volume of cases.
Verification asks “Are we building the product right?” — it checks that code meets specified requirements through reviews, walkthroughs, and inspections. Validation asks “Are we building the right product?” — it checks that software meets actual end-user needs through testing, UAT, and demos. Both are required and serve different purposes. A system can be perfectly verified (code matches spec exactly) but fail validation if the spec didn’t accurately reflect what users actually needed.
Spreadsheets break at scale in several critical ways: no audit trail, no real-time collaboration without version conflicts, no traceability between test cases and builds, no regression suite management, and no analytics. A tool like Tuskr provides all of these plus workload distribution, CI/CD integration, peer review comments, burndown charts, dark mode, and a recycle bin for accidental deletions — in an interface that’s faster to use for test management tasks than any spreadsheet ever will be.
Ready to Test Smarter — Starting Today?
Join thousands of QA teams who use Tuskr to manage risk-based priorities, track exploratory sessions, run focused regression suites, and continuously improve.


